This is production-grade, exactly how SRE teams do RCA.
🧠 End-to-End Flow (Rocky Linux 8.10)

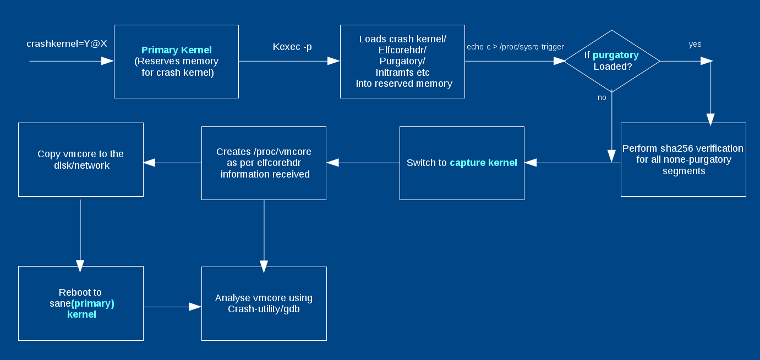
Kernel Panic
   ↓
kdump captures vmcore
   ↓
System reboots
   ↓
vmcore saved in /var/crash
   ↓
Analyze using crash + kernel-debuginfo
   ↓
Root Cause Analysis
✅ STEP 0: Confirm OS & Kernel (Baseline)
cat /etc/os-release
uname -r
Expected:
Rocky Linux 8.10
4.18.0-553.el8_10.x86_64   (example)
⚠️ Kernel version MUST match debuginfo
1️⃣ STEP 1: Confirm It Was a Kernel Panic
After the node rebooted:
journalctl -b -1 -k | tail -50
Look for:
Kernel panic - not syncing
BUG: unable to handle kernel NULL pointer dereference
watchdog: soft lockup
Check reboot reason:
last -x | grep reboot
If kernel panic is confirmed → continue.
2️⃣ STEP 2: Verify kdump Is Enabled (MANDATORY)
Check kdump service
systemctl status kdump
Expected:
Active: active (exited)
Check crashkernel parameter
cat /proc/cmdline
Must include:
crashkernel=512M
❌ If missing → vmcore will NOT be generated
3️⃣ STEP 3: Locate vmcore Files
Rocky Linux stores core dumps here:
ls -lh /var/crash/
Example:
/var/crash/127.0.0.1-2025-12-22-14:32/
 ├── vmcore
 ├── vmcore-dmesg.txt
📌 Files meaning:
vmcore → full memory dump (used by crash tool)
vmcore-dmesg.txt → kernel logs at crash time (fast RCA)
4️⃣ STEP 4: Install Required Packages (Safe in Production)
Install crash utility
yum install -y crash
Install matching kernel debuginfo
dnf debuginfo-install kernel-$(uname -r)
Verify debuginfo installed correctly
ls -lh /usr/lib/debug/lib/modules/$(uname -r)/vmlinux
Expected:
-rwxr-xr-x 1 root root 300M+ vmlinux
❌ If vmlinux is missing → analysis will fail
5️⃣ STEP 5: Start vmcore Analysis (MOST IMPORTANT)
Run:
crash \
/usr/lib/debug/lib/modules/$(uname -r)/vmlinux \
/var/crash/*/vmcore
You will enter:
crash>
6️⃣ STEP 6: Mandatory crash Commands (DO NOT SKIP)
🔴 1. Check panic message
crash> log
Shows:
Panic reason
RIP (crashed function)
Kernel BUG info
🔴 2. Stack trace of crashed CPU
crash> bt
This usually directly shows the faulty module or function.
🔴 3. Stack trace of all CPUs
crash> bt -a
Use this to detect:
Soft lockups
Hung CPUs
Deadlocks
🔴 4. Loaded kernel modules
crash> mod
Look for:
NIC drivers (
mlx5_core,ixgbe)Storage drivers (
nvme,dm_multipath)Third-party modules
🔴 5. Memory status
crash> kmem -i
Checks:
Memory exhaustion
Fragmentation
Corruption indicators
🔴 6. Slab corruption (VERY COMMON)
crash> kmem -s
Slab corruption = bad driver / kernel bug
7️⃣ STEP 7: Identify Root Cause (How to Read Output)
Example crash output
RIP: mlx5e_napi_poll
Call Trace:
 mlx5e_poll_rx_cq
 net_rx_action
 __do_softirq
Interpretation
mlx5e_*  → Mellanox NIC driver
RX path  → Network traffic triggered
✅ Root Cause: NIC driver kernel panic
8️⃣ STEP 8: Quick RCA Using vmcore-dmesg.txt (Fastest)
When crash tool is not available:
cat /var/crash/*/vmcore-dmesg.txt | tail -50
Look for:
Kernel panic - not syncing
RIP: function_name
🔥 Often enough for initial RCA
Common Panic Patterns (Rocky Linux 8.10)


| Pattern in Output | Meaning |
|---|---|
mlx5_core | NIC driver issue |
nvme | Disk / firmware |
BUG: | Kernel bug |
watchdog | CPU soft lockup |
slab corruption | Memory overwrite |
net_rx_action | Network flood / driver |
9️⃣ STEP 9: (If Kubernetes Node) Correlate with K8s
kubectl describe node <node-name>
kubectl get events -A --sort-by=.lastTimestamp
Look for:
Node reboot time
Pod evictions
CNI / CSI restarts
High CPU / DPDK pods
🔟 STEP 10: Final RCA Template (Use This)
Incident: Kernel Panic on Worker Node
OS: Rocky Linux 8.10
Kernel: 4.18.0-553.el8_10
Time: 22-Dec-2025 14:32 IST

Root Cause:
Kernel panic caused by mlx5_core NIC driver
NULL pointer dereference during RX polling

Evidence:
- vmcore backtrace shows mlx5e_napi_poll
- vmcore-dmesg confirms RIP in NIC driver

Impact:
- Node rebooted
- Pods evicted
- 6 minutes downtime

Fix:
- Upgraded NIC firmware
- Kernel errata applied

Prevention:
- Enable reboot alerts
- Maintain kernel debuginfo cache
✅ Production Best Practices (MUST FOLLOW)
✔ Keep kdump always enabled
✔ Cache kernel-debuginfo
✔ Monitor node reboots
✔ Avoid privileged containers
✔ Keep kernel & firmware aligned
✔ Archive vmcore after RCA