Wednesday 29 May 2019

How to remotely manage an Amazon EC2 instance using Systems Manager Run Command by Raj Gupta

Step 1:-

Attach an IAM role with the AmazonEC2RoleforSSM managed policy to an Amazon EC2 instance.

Step 2 :-

If you are using IAM user account then Grant Your User Account Access to Systems Manager by attaching Policy AmazonSSMFullAccess to user account.

Step 3:-

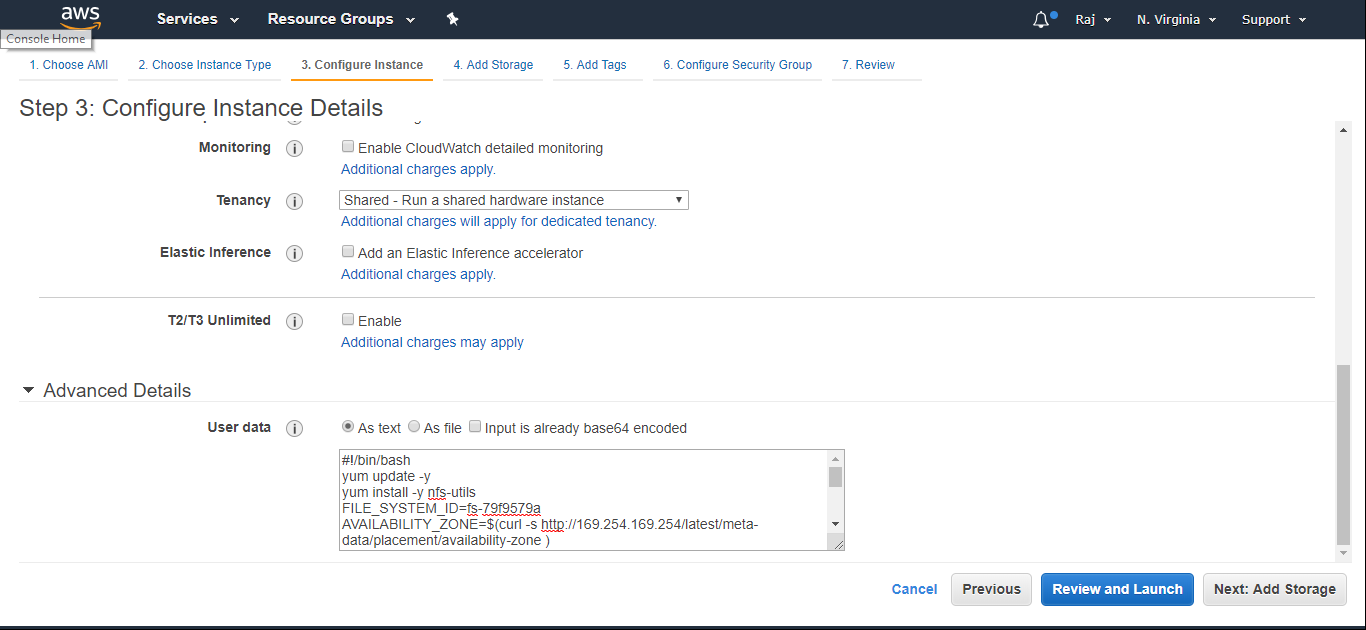
Install the SSM Agent

The agent is installed by default on Windows AMIs starting in November 2016 and later, Amazon Linux AMIs starting with 2017.09, and all Amazon Linux 2 AMIs

Step 4:-

To execute a command using Run Command from the console

 EC2 console --->> Run Command Tab


For Command document, choose AWS-RunPowerShellScript for Windows instances, and AWSRunShellScript for Linux instances.

Name : AWS-RunShellScript

For Target instances, choose the instance you created

For Commands, type Get-Service for Windows, or ps aux for Linux


Choose Run to execute the command. Run Command displays a status screen. Choose View result


Friday 24 May 2019

How to create Auto Scaling group by using launch configuration by Raj Gupta

Select the launch configuration then click on create Auto Scaling group


On the Configure Auto Scaling group details page, do the following:

  • For Group name, type a name for the Auto Scaling group. For example, my-asg. 
  • For Group size, type the number of instances (for example, 2). Note that we recommend that you maintain approximately the same number of instances in each Availability Zone. 
  • Select your VPC from Network and your two public subnets from Subnet. 
  • Under Advanced Details, select Receive traffic from one or more load balancers. Select your target group from Target Groups. 
  • Choose Next: Configure scaling policies.

On the Configure scaling policies page, choose Review, as we will let Amazon EC2 Auto Scaling maintain the group at the specified size. Note that later on, you can manually scale this Auto Scaling group, configure the group to scale on a schedule, or configure the group to scale based on demand.

On the Review page, choose Create Auto Scaling group

After the group is created, choose Close.


Verify that your instances are ready. From the Auto Scaling Groups page, select your Auto Scaling group, and then choose the Instances tab. Initially, your instances are in the Pending state. When their states are InService, they are ready for use.


How To Create launch configuration in AWS By Raj Gupta

We need to Create launch configuration by using below step:-


choose Create launch configuration --->> On the Choose AMI page, select the My AMIs tab, and then select the AMI that you created

On the Choose Instance Type page, select an instance type, and then choose Next: Configure details.

 On the Configure details page, do the following:

  • For Name, type a name for your launch configuration (for example, my-launch-config). 
  • For IAM role, select the IAM role that you created. This role grants your application the access to AWS it needs
  • (Optional) If you need to run a startup script, expand Advanced Details and type the script in User data. 
  • Choose Skip to review.

Then click on add storage and then click on next tab security group and add appropriate security group required.

You can select an existing security group or create a new one. This security group must allow HTTP traffic and health checks from the load balancer. If your instances will have public IP addresses, you can optionally allow SSH traffic if you need to connect to the instances. When you are finished, choose Review.


On the Review page, choose Create launch configuration.
When prompted, select an existing key pair, create a new key pair, or proceed without a key pair. Select the acknowledgment check box, and then choose Create launch configuration.


How To Distribute traffic between more then one server by using Application Load Balancer By Raj Gupta


Use the following procedure to create a Application Load Balancer :-

1. Open the Amazon EC2 console at https://console.aws.amazon.com/ec2/.
2. On the navigation pane, under LOAD BALANCING, choose Load Balancers.
3. Choose Create Load Balancer.
4. For Application Load Balancer, choose Create


5. On the Configure Load Balancer page, do the following:

  • For Name, type a name for your load balancer. For example, my-lb. 
  • For Scheme, keep the default value, internet-facing. 
  • For Listeners, keep the default, which is a listener that accepts HTTP traffic on port 80. 
  • For Availability Zones, select the VPC that you used for your instances. Select an Availability Zone and then select the public subnet for that Availability Zone. Repeat for a second Availability Zone. 
  • Choose Next: Configure Security Settings.


Now use the exiting or create new security group that allows traffic to the port configured for the listener(port 80) then Choose Next: Configure Routing


On the Configure Routing page, do the following: 
  • For Target group, keep the default, New target group. 
  • For Name, type a name for the target group. 
  • Keep Protocol as HTTP, Port as 80, and Target type as instance. 
  • For Health checks, keep the default protocol and path. 
  • Choose Next: Register Targets.


On the Register Targets page , Register all the EC2 server on which you want to do load balance 


On the Review page, choose Create


After load Balancer is created use the load Balancer DNS name to test 

Wednesday 22 May 2019

How To Add Volumes to an AMI of EC2 Server By Raj Gupta


Open the Amazon EC2 console --->> In the navigation pane, choose Instances --->> Select an instance and choose Actions, Image, Create Image


In the Create Image dialog box, choose Add New Volume -->> Select a volume type from the Type list and a device name from the Device list. For an EBS volume, you can optionally specify a snapshot, volume size, and volume type --->> Choose Create Image.


Viewing the EBS Volumes in an AMI Block Device Mapping

Select the desired AMI, and look at the Details tab. At a minimum, the following information is available for the root device:


  • Root Device Type (ebs) 
  • Root Device Name (for example, /dev/sda1) 
  • Block Devices (for example, /dev/sda1=snap-1234567890abcdef0:8:true)
If the AMI was created with additional EBS volumes using a block device mapping, the Block Devices field displays the mapping for those additional volumes as well


Tuesday 21 May 2019

How to copy a file to or from Amazon S3 and your EC2 instance By Raj Gupta


Option 1:- By using GET or wget

 The wget utility is an HTTP and FTP client that allows you to download public objects from Amazon S3. It is installed by default in Amazon Linux and most other distributions, and available for download on Windows. To download an Amazon S3 object, use the following command, substituting the URL of the object to download.

[root@ip-172-31-33-189 ~]# wget https://s3.amazonaws.com/raj05212019/pic1.png

[root@ip-172-31-33-189 ~]# ls
pic1.png

So one file pic1.png downloaded from s3 bucket to our EC2 server.

This method requires that the object you request is public; if the object is not public, you receive an "ERROR 403: Forbidden" message. If you receive this error, open the Amazon S3 console and change the permissions of the object to public


Option 2:-  By using AWS Command Line

For this we required a system in which AWS CLI tool already install.

Use the following command to copy an object from Amazon S3 to your instance by using AWS CLI

[root@ip-172-31-33-189 ~]# aws s3 cp s3://raj05212019/pic1.png pic2.png
download: s3://raj05212019/pic1.png to ./pic2.png
[root@ip-172-31-33-189 ~]# ls
pic1.png  pic2.png

Use the following command to copy an object from your instance back into Amazon S3. 

[root@ip-172-31-33-189 ~]# aws s3 cp pic2.png s3://raj05212019/pic2.png
upload: ./pic2.png to s3://raj05212019/pic2.png

Use the following command to download an entire Amazon S3 bucket to a local directory on your EC2 server.

[root@ip-172-31-33-189 rahul]# aws s3 sync s3://raj05212019 /root/rahul
download: s3://raj05212019/ramu.txt to ./ramu.txt
download: s3://raj05212019/pic1.png to ./pic1.png
download: s3://raj05212019/pic2.png to ./pic2.png
[root@ip-172-31-33-189 rahul]# ls
pic1.png  pic2.png  ramu.txt

The aws s3 sync command can synchronize an entire Amazon S3 bucket to a local directory location. This can be helpful for downloading a data set and keeping the local copy up-to-date with the remote set. If you have the proper permissions on the Amazon S3 bucket, 

you can push your local directory back up to the cloud when you are finished by reversing the source and destination locations in the command.

[root@ip-172-31-33-189 rahul]# aws s3 sync /root/rahul s3://raj05212019 


How to Mount the File System during launch of EC2 Server by Raj Gupta

Use the following procedure to launch two t2.micro instances. The user data script mounts the file system to both instances during launch and updates /etc/fstab to ensure that the file system is remounted after an instance reboot.


On the Configure Instance Details page, do the following:

  • For Number of instances, type 2. 
  • [Default VPC] If you have a default VPC, it is the default value for Network. Keep the default VPC and the default value for Subnet to use the default subnet in the Availability Zone that Amazon EC2 chooses for your instances. 
  • [Nondefault VPC] Select your VPC for Network and a public subnet from Subnet.
  • [Nondefault VPC] For Auto-assign Public IP, choose Enable. Otherwise, your instances do not get public IP addresses or public DNS names. 
  • Under Advanced Details, select As text, and paste the following script into User data. Update FILE_SYSTEM_ID with the ID of your file system. You can optionally update MOUNT_POINT with a directory for your mounted file system.

#!/bin/bash
yum update -y
yum install -y nfs-utils
FILE_SYSTEM_ID=fs-79f9579a
AVAILABILITY_ZONE=$(curl -s http://169.254.169.254/latest/meta-data/placement/availability-zone )
REGION=${AVAILABILITY_ZONE:0:-1}
MOUNT_POINT=/mnt/efs
mkdir -p ${MOUNT_POINT}
chown ec2-user:ec2-user ${MOUNT_POINT}
echo ${FILE_SYSTEM_ID}.efs.${REGION}.amazonaws.com:/ ${MOUNT_POINT} nfs4 nfsvers=4.1,rsize=1048576,wsize=1048576,hard,timeo=600,retrans=2,_netdev 0 0 >> /etc/fstab
mount -a -t nfs4


Then create the EC2 as a normal process we are using.


Now Test the File System

You can connect to your instances and verify that the file system is mounted to the directory that you specified (for example, /mnt/efs).

From the terminal window for each instance, run the df -T command to verify that the EFS file system is mounted


[ec2-user@ip-172-31-91-16 ~]$ df -T
Filesystem                                Type            1K-blocks    Used        Available Use% Mounted on
devtmpfs                                  devtmpfs           494096      64           494032   1% /dev
tmpfs                                     tmpfs              504708       0           504708   0% /dev/shm
/dev/xvda1                                ext4              8189348 1125496          6963604  14% /
fs-79f9579a.efs.us-east-1.amazonaws.com:/ nfs4     9007199254739968       0 9007199254739968   0% /mnt/efs

(Optional) Create a file in the file system from one instance, and then verify that you can view the file from the other instance.

From the first instance, run the following command to create the file:
[ec2-user@ip-172-31-91-16 ~]$  sudo touch /mnt/efs/test-file.txt

From the second instance, run the following command to view the file:
[ec2-user@ip-172-31-85-61 ~]$ ls /mnt/efs
test-file.txt


Monday 20 May 2019

How To Mount An EFS File System To Running EC2 Server By Raj Gupta


1. If you're using an Amazon Linux EC2 instance, install the EFS mount helper with the following command:

sudo yum install -y amazon-efs-utils

You can still use the EFS mount helper if you're not using an Amazon Linux instance.

If you're not using the EFS mount helper, install the NFS client on your EC2 instance:

On a Red Hat Enterprise Linux or SUSE Linux instance, use this command:
sudo yum install -y nfs-utils

On an Ubuntu instance, use this command:

sudo apt-get install nfs-common

2. Create a new directory on your EC2 instance, such as "efs".


[root@ip-172-31-18-222 ~]# sudo mkdir efs

3. Mount your file system with a method listed following. If you need encryption of data in transit, use the EFS mount helper and the TLS mount option. 

Using the EFS mount helper:
[root@ip-172-31-18-222 ~]# sudo mount -t efs fs-759c3196:/ efs


Using the EFS mount helper and the TLS mount option:
[root@ip-172-31-18-222 ~]# sudo mount -t efs -o tls fs-759c3196:/ efs

Using the NFS client:
[root@ip-172-31-18-222 ~]# sudo mount -t nfs4 -o nfsvers=4.1,rsize=1048576,wsize=1048576,hard,timeo=600,retrans=2,noresvport fs-759c3196.efs.us-east-1.amazonaws.com:/ efs

To check the EFS mount point the the below command:- 

[root@ip-172-31-18-222 ~]# df -h
Filesystem                                 Size  Used Avail Use% Mounted on
devtmpfs                                   483M   64K  483M   1% /dev
tmpfs                                      493M     0  493M   0% /dev/shm
/dev/xvda1                                 7.9G  1.1G  6.7G  14% /
fs-759c3196.efs.us-east-1.amazonaws.com:/  8.0E     0  8.0E   0% /root/efs
127.0.0.1:/                                8.0E     0  8.0E   0% /root/efs
fs-759c3196.efs.us-east-1.amazonaws.com:/  8.0E     0  8.0E   0% /root/efs

How To Create An Amazon EFS File System By Raj Gupta

Amazon EFS enables you to create a file system that multiple instances can mount and access at the same time. This is same as like external hard disk.


1. Open the Amazon Elastic File System console at https://console.aws.amazon.com/efs/
2. Choose Create file system.
3. On the Configure file system access page, do the following:

  • For VPC, select the VPC to use for your instances. 
  • For Create mount targets, select all the Availability Zones. 
  • For each Availability Zone, ensure that the value for Security group is the security group that you created. 
  • Choose Next Step.


4. On the Configure optional settings page, do the following: 
  • For the tag with Key=Name, type a name for the file system in Value. 
  • For Choose performance mode, keep the default option, General Purpose. 
  • Choose Next Step. 

5. On the Review and create page, choose Create File System.


6. After the file system is created, note the file system ID, as you'll use it later


Thursday 16 May 2019

How do I resolve the error when trying to release an Elastic IP address from my Amazon EC2 instance by Raj Gupta


Issue:-

when we are getting error "The address with allocation id cannot be released because it is locked to your account" when trying to release an Elastic IP address from my Amazon EC2 instance?

Root Cause:-  

This error message is generated when a reverse Domain Name System (rDNS) record is created for your Elastic IP address. The Elastic IP address is locked to your account for as long as the rDNS record exists.

Reverse DNS (rDNS) is a method of resolving an IP address into a domain name, just as the domain name system (DNS) resolves domain names into associated IP addresses.


Solution:- 

For this we need to Request removal of the rDNS entry from AWS  by creating ticket.

Open the link Request to Remove Email Sending Limitations form

Then fill the below details:- 


  • Email Address: Your email address
  • Use Case Description: Leave blank
  • Elastic IP Address 1: The first IP address with an rDNS
  • Elastic IP Address 2: Leave blank
  • Reverse DNS Record for EIP 1: Enter please remove rDNS
  • Reverse DNS Record for EIP 2: Leave blank

Choose Submit.


Note: Removing the rDNS might take a few days to propagate through the system.

After you receive notice that the rDNS is removed then you are able to remove the Elastic IP from EC2 Server.

We can also able to check rDNS is removed or not by running the below command

If it is removed then it will give output like below
[root@ip-172-31-81-127 ~]# host 3.212.44.7

7.44.212.3.in-addr.arpa domain name pointer ec2-3-212-44-7.compute-1.amazonaws.com.

If it is not removed then it will give output like below
[root@ip-172-31-81-127 ~]# host 3.212.44.7
3.212.44.7.in-addr.arpa. domain-name-pointer mail.domain.com

Monday 6 May 2019

What are all Tag Restrictions for AWS services by Raj Gupta

The following basic restrictions apply to tags for any AWS services:


• Maximum number of tags per resource – 50
• For each resource, each tag key must be unique, and each tag key can have only one value.
• Maximum key length – 128 Unicode characters in UTF-8
• Maximum value length – 256 Unicode characters in UTF-8
• Although EC2 allows for any character in its tags, other services may be more restrictive. Generally allowed characters are: letters, numbers, and spaces re-presentable in UTF-8, and the following characters: + - = . _ : / @. These characters may not be allowed by more restrictive services.
• Tag keys and values are case-sensitive.
• Don't use the aws: prefix for either keys or values; it's reserved for AWS use. You can't edit or delete tag keys or values with this prefix. Tags with this prefix do not count against your tags per resource limit.
• You can tag public or shared resources, but the tags you assign are available only to your AWS account and not to the other accounts sharing the resource.
• You can't tag all resources.


How to Work with Tags Using the AWS Console by Raj Gupta


1. Displaying Tags for Individual Resources

• On the Tags tab, select Show Column. A new column is added to the console.


2. Displaying Tags for All Resources

EC2 console  --> Tags Tab


3. To add a tag to an individual resource


EC2 console  -->Select EC2 server --> Tags Tab  ---> Add/Edit Tags ---> Create Tag ---> Enter the Key and Value ---> Save


4. To delete a tag from an individual resource

EC2 console  -->Select EC2 server --> Tags Tab  ---> Add/Edit Tags ---> Select the Delete icon  ---> Save


5. To add a tag to a group of resources

EC2 console --> Tags tab ---> Manage Tags ---> Form Filter, select the type of resource to which to add tags   ---> In the resources list, select the check box next to each resource to which to add tags ---> Under Add Tag, for Key and Value, type the tag key and values, and then choose Add Tag.

Note:- If you add a new tag with the same tag key as an existing tag, the new tag overwrites the existing tag.


6. To remove a tag from a group of resources

EC2 console --> Tags tab ---> Manage Tags ---> Form Filter, select the type of resource to which to remove tags   ---> In the resources list, select the check box next to each resource to which to remove tags ---> Under Remove Tag, for Key, type the tag's name and choose Remove Tag


7. Adding a Tag When You Launch an Instance

On the Add Tags page, specify tags for the instance, the volumes, or both. Choose Add another tag to add more than one tag to your instance.


8. To filter a list of resources by tag

Choose the filter icon in the top right corner of the column for the tag to display the filter list.Select the tag values, and then choose Apply Filter to filter the results list.


Thursday 2 May 2019

How to work with Tags Using the AWS CLI by Raj Gupta


1. The following command describes the instances with a Env tag, regardless of the value of the tag

[root@ip-172-31-89-253 ~]# aws ec2 describe-instances --filters Name=tag-key,Values=Env


2. The following command describes the instances with the tag Env=Production.

[root@ip-172-31-89-253 ~]# aws ec2 describe-instances --filters Name=tag:Env,Values=Production

3. The following command describes the instances with a tag with the value production, regardless of the tag key

[root@ip-172-31-89-253 ~]# aws ec2 describe-instances --filters Name=tag-value,Values=Production

4. Add a tag to a resource

[root@ip-172-31-89-253 ~]# aws ec2 create-tags --resources i-06c71b2bc3588adb8 --tags Key=Raj,Value=Gupta

5. Add tags with special characters

This example adds the tag [Group]=test to an instance. The square brackets ([ and ]) are special characters, and must be escaped with enclose the entire key and value structure with single quotes ('), and then enclose the element with the special character with double quotes (")..

[root@ip-172-31-89-253 ~]# aws ec2 create-tags --resources i-06c71b2bc3588adb8 --tags 'Key="[Group]",Value=test'

6. Add tags to multiple resources

[root@ip-172-31-89-253 ~]# aws ec2 create-tags --resources i-070e26baf98bd7575 i-06c71b2bc3588adb8 --tags Key=Raj1,Value=Gupta1 Key=Raj2,Value=Gupta2

7. Create a volume and apply a tag

The following command creates a volume and applies two tags: purpose = production, and costcenter = cc123.

aws ec2 create-volume --availability-zone us-east-1a --volume-type gp2 --size 80 --tag-specifications 'ResourceType=volume,Tags=[{Key=purpose,Value=production},{Key=costcenter,Value=cc123}]'

8. Launch an instance and apply tags to the instance and volume

aws ec2 run-instances --image-id ami-abc12345 --count 1 --instancetype t2.micro --key-name MyKeyPair --subnet-id subnet-6e7f829e --tagspecifications 'ResourceType=instance,Tags=[{Key=webserver,Value=production}]' 'ResourceType=volume,Tags=[{Key=cost-center,Value=cc123}]' 

Wednesday 1 May 2019

How to use Amazon EC2 Usage Reports by Raj Gupta

If you want to know the answer for below question regarding about your EC2 server


• How much am I spending on instances of each instance type?
• How many instance hours are being used by a particular department?
• How is my instance usage distributed across Availability Zones?
• How is my instance usage distributed across AWS accounts?
• How well am I using my Reserved Instances?
• Are my Reserved Instances helping me save money?


Then you need to use Cost Explorer serveses of AWS

EC2 console ---> Reports Tab ---> Then click on  EC2 Instance Usage Report or EC2 Reserved Instance Utilization Report as per your requirement  ---> Then it will redirect to Cost Explorer Tab


Cost Explorer provides a preconfigured view, based on fixed filter settings, that displays information about your usage and cost trends.


How to View Your Current Limits of AWS services by Raj Gupta

To view Your Current Limits of AWS services on a per-region basis.


 EC2 console ---> Limit Tab